Fill out your e-mail address to receive
my Etsy shop's newsletter containing
special previews and announcements!
Subscribe Unsubscribe

Wednesday, December 19, 2007

Handmade Bath Products: Bath Tea

This one is a total cheat. But if you package it in a cute enough way people will be impressed. Make three and bundle them together in a nice fabric and tie a ribbon at the top.

A note about herbs: I used food grade herbs because you (or your giftee) will be absorbing elements of these products while you're soaking in them so it's best to go ahead and use the same thing you'd put in your body.

Lavender Mint Bath Tea

Lavender Mint Bath Tea

Small Muslin Bags (you can get them at papermart)
Dried Lavender Buds
Mint Tea (any kind of blend will do really but be careful with caffeinated blends for the overly caffeine sensitive)
A business card sized card to write on
optional: dried baby rosebuds

Blend lavender with tea and optional rosebuds. Don't crush too much. Put in bags. Tie double knots in bag to close.

Seriously that's all. Attach cute card with this written on it: Run warm bath and drop unopened bag in water. Allow to steep like tea. Can be hung to dry and reused two more times.

I actually got pretty hyper taking a bath with one that had a caffeinated mint tea in it. Remember this stuff does come in through your pores so be careful if you're making it for people who are sensitive to caffeine or include a warning on the card.

It's a pretty cute and easy present though isn't it?

Tuesday, December 18, 2007

Handmade Bath Products: Hand Scrub

The idea for this came from this hand scrub my mother in law was using a few years ago. She just loved it and it was essentially some kind of oil and an exfoliating product. I think it was from beauticontrol which isn't all that expensive but while I was experimenting with making bath and body stuff I decided to try this out.

I did some sleuthing around on the web and decided that sea salt and almond oil would be the best thing for the job. I was working with lemongrass rom the last project so I added some to this one to make it a little different.

Again I used a container I got at Hobby Lobby. This one definitely needs to have a wider mouth at the top so you can reach in there and grab a gob of scrub easily.

Almond Lemongrass Hand Scrub

Almond Lemongrass Hand Scrub

Three cups Sea Salt, ground
Three cups Almond Oil with vitamin B added (Vitamin B is a good preservative, it can be bottled this way, if not just puncture and empty three Vitamin B caplets into the oil)
1/2 cup Epsom salt, ground
1 Tablespoon Lemongrass, finely ground
a dash of Lemongrass essential oil

Blend the dry ingredients together, shaking them and stirring them a bit. Add Almond oil and stir with a spoon, this will not mix completely but you want the salts soaking in the oil. Add a dash of lemongrass essential oil. Let it sit at room temperature.

Hand Scrub Detail

As much as you mix it, the oil and salt will separate and that's ok. The key to this is sticking your hand through the oil and grabbing a gob of the salt. The salts will slough the rough top layers of skin on your hands while the oil will leave a moisturizing coat on the new layer of skin. Put it into a jar and keep it by the sink.

Here are some directions you can include on a label for your gift:
Wet hands with warm water, take a small handful of salt from the bottom of the jar. Rub salt on hands and elbows to remove rough skin. Rinse salt off with warm water. Pat dry. Use mild soap to remove some of the oil if desired.

Keep at room temperature.


I'll design some labels for people to download and print out next month.

I'll post the recipes for the Lavender Mint Tea and Seascapes Bath salt by the weekend!

Monday, December 17, 2007

Handmade Bath Products: Milk Bath

Continuing in my posts about cheap gift ideas you can make at home. I made these for the gift exchange portion of the annual ornament party. My thinking behind this is that I've been spending a lot of money on Lush bath bombs and bubble bars so I was trying to come up with maybe making my own versions.

These are all things you can get at your grocery or natural foods grocery store. I bought the glass containers at hobby lobby. They weren't very expensive. You could reuse mason jars or pasta sauce jars but all mine are used for dyeing :) The muslin bags for the bath tea were from my herb supply source and can be bought at places like papermart.

A note about herbs: I used food grade herbs because you (or your giftee) will be absorbing elements of these products while you're soaking in them so it's best to go ahead and use the same thing you'd put in your body.

Along the Garden Path Milk Bath

Along the Garden Path Milk Bath

5 cups powdered milk
3 cups sea salt
3 cups epsom salts
1/4 cup baking soda
2 tablespoons dried lavender, finely ground
1 tablespoon dried lemongrass, finely ground
dash or drop of lavender scented oil

Grind the herbs as finely as possible in an electric grinder. Blend all the dried ingredients in a bowl. Add 1 dash or drop of scented oil and blend. If it doesn't smell strong enough for you (that's doubtful, it will smell strong!) add another dash. Put in a jar and give it a good shake.

Milk Bath detail

Print up a cute label and stick it on.

Include these directions: Scoop 1/2 to 1 cup of mixture under running water. Allow to dissolve then soak and relax. Rinse yourself and the tub off thoroughly then pat dry and enjoy your softly scented skin!

I named it Along the Garden Path because..I dunno it was a pretty name and the bath smelled garden-y. Enjoy! More recipes coming!

Saturday, December 15, 2007

Easy (and cheap) handmade ornaments

The annual Aunts' Christmas party was last month and everything I brought was crafted! Yes I'm crazy.

Winter Wonderland Ornaments

This is a fun little ornament idea Cody and I came up with.


I found these empty glass ornaments on sale for half price in October so I stocked up on them. We filled these with Polyfil (I have three bags for some reason) and used very long tweezers to put tiny miniature ornaments, buttons, and decorative doodads inside. I cut pieces of red or green ribbon for hangers. Voila!

Yarn balls

I can't claim the original idea for this but I can't remember who came up with it either. I saw it on a blog last year and thought it was incredibly cool.


I took more of those glass balls and filled them with red or green sparkly novelty fun fur yarn. It took maybe 3 yards each? Shook them gently, put on the top and used a bit of red or green ribbon for a hanger. Best use of fun fur ever.

I tried this same idea with roving and other yarn but the fun fur really looked best.


Yay for clear glass ornaments!

Next post I'll tell you how I made bath products for a party gift but I have to go dye more yarn now.

Wednesday, December 12, 2007

Kits are selling out!

Wow! A very nice mention in the Ravelry forums has made me sell out of my Learn to Knit kits! I've started making some kits with my handspun now but I don't have a whole lot of that in stock either. Can't really complain about a problem like this can I?


I'm halfway through my fingering weight sock yarn order for Eat Sleep Knit. I'm working overtime to get that shipped before I go on vacation.

Sunday, December 9, 2007

Shibori Scarf Tutorial

Continuing to move my patterns and tutorials over to this blog :)

As usual, all of my patterns (including the ones for sale) are what I call charitable copyright which means that they are intended for personal use unless you're selling the items to benefit a charity.

This tutorial was created when I was doing the Funky Scarf Swap in Oct. 2006.

First, the swap person I got

  • liked the color green
  • preferred a funky pattern to a funky yarn
  • wanted it longer as opposed to fatter
  • could use it for some warmth.


  • This reminds me of my beginner 3d design class assignments, how fun!! No really!

    My thought process:

    I had two skeins of some lamb's pride worsted in a dark forest green but they were leftovers from two different projects so two different dye lots.

    I've been wanting to try this shibori resist method for felting since I read about it in the Fall 2005 Interweave Knits. Well, technically when you knit something and change it into felt in hot water and agitation it's fulling but let's just call it felting to cut down on confusion.

    So..the shibori felted examples I'd seen looked much better to me when they'd been used on stockinette stitches. So I'd want to use it in stockinette.

    And since she wanted it longer I would need to knit it lengthwise - because the knit stitches felt more vertically, they don't felt as much horizontally.

    So stockinette and lengthwise. I'd do it in the round! Easy peasy! Then cut it after I felt it (fyi: cutting something after knitting it is called steeking)! Woo!

    So here we go..

    Step 1 Knitting the scarf

    I cast on 200 stitches using Lamb's Pride worsted onto size 11 denise needles using a very long cable.

    Then I joined it in the round and knit a few rows of garter stitch. In this case it's a knit row, a purl row, a knit row, since it's in the round.

    Didn't seem to make much of a difference the stockinette still curled. But it's ok.
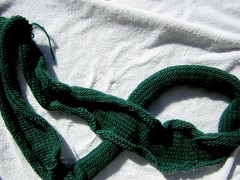
    Step 1: knitting

    Since I was using two balls with different dye lots so I alternated the skeins every row, carrying the yarn up on the inside seam. That created the striping effect. This was totally not noticeable in the final product.

    I continued knitting around and around until I ran out of the smaller ball of yarn, then I did three rows of garter stitch and cast off. I didn't bother sewing the ends in, just tied knots. That's why I love felting!

    And now we have a giant knit circle that's rolling up into a tube! Yay!
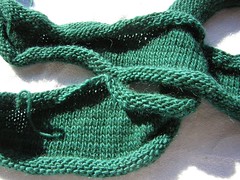
    Step 1: knitting

    Step 2: Adding the Resists

    Step 2: creating Resistance

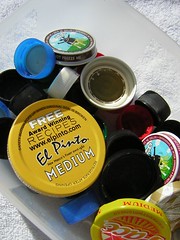
    I'd been saving bottlecaps and lids for the last few months for this project. So I needed those, some rubber bands, and plastic of some kind. I found that cut up freezer storage bags worked best in the end.

    I put the bottlecaps on the "wrong side" of the knitting (the purl side), then covered the top, the "right side" with the plastic.

    THEN I used old rubber bands to secure the knitting between the plastic wrap and the bottlecap.
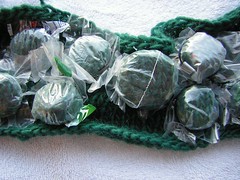
    Step 2: creating Resistance

    This is what the "wrong side" looked like
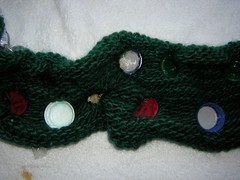
    Step 2: creating Resistance

    I carefully planned out the shapes on both sides of the scarf while I was attaching the bottlecaps. I already knew where the neck was going to be and where I was going to "steek" it. So the bottom edges will have more bumps in them and slowly taper off up towards the neck.
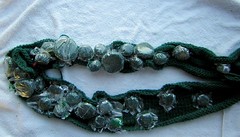
    Step 2: creating Resistance

    Step 3: Fulling with resists

    Step 3: Felting

    I put the scarf in a lingerie washing bag, you know the kind with the holes in it? (I use that to cut down on the chances of fluffy bits clogging up my washing machine)

    And dropped it in the washing machine with my pair of "felting" jeans. These are some big old jeans of Cody's that have shrunk anyway so they make for great felting agitation in the machine.

    I filled the machine to the small water setting on hot with some squirts of lavender baby shampoo. And ran it about one and a half washing cycles, about fifteen minutes, checking periodically to see how it was doing.

    When it seemed felted enough, I ran it in a cold rinse and spin. People debate the spin cycle thinking that it causes creases in the felted product but I like to use it and I don't let it spin for that long.

    Then I took it out and rinsed it again just to be sure the soap was out.

    Step 4: Removing resists, trimming, and drying

    Be warned, when it came out it was a MESS. The plastic hadn't stayed on all the bottlecaps and even a few bottlecaps had come off. THAT WAS OK! It still looked pretty neat and I liked the randomness of what had stayed and what hadn't.

    I took the remaining rubber bands, plastic, bottlecaps, and lids out while the scarf was still wet and pliable. I also used this as an opportunity to reshape any spots that weren't right, felt any missed bits by hand, trim extra fuzzy bits I didn't like, and cut off the ends that I hadn't sewn in before.

    I also cut the steek with a pair of scissors and fuzzed the end up a bit. Now it's an actual scarf not a big circle!

    Then I hung it on a hanger and let it dry for a few days.

    Step 5: Having a Funky Scarf!!
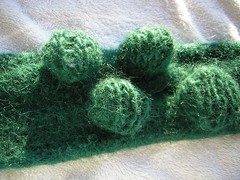
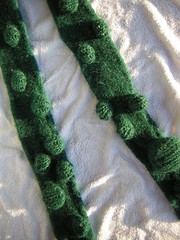
    Can't say it's not funky!

    Shibori Scarf!

    The "cut" end
    Steeked end

    ignore the painty spotty work short
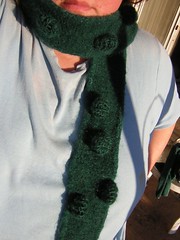
    Shibori Scarf!

    I created a flickr set with more photos and complete instructions as well.

    You can use more than bottlecaps but anything that can be tied to the scarf and survive a good hot washing machine.

    This same resist method can be used for dyeing as well as felting! Didn't you wonder where the hippies came up with the idea for "tie dyes"? It's based on the shibori resist concept! You can just tie the fabric up in various ways and see what comes out! There are particularly beautiful results with silk.

    Wednesday, December 5, 2007

    Eat Sleep Knit aran weight yarns are in stock!

    My yarn arrived in Atlanta yesterday and wow Erin already has them all photographed and listed!


    She also wrote a very nice blog post about it.


    I'm just giddy with excitement (I really am!) about all the big moves my Noodles have been making lately!

    I'm already slaving away on the fingering weight yarn for the December shipment. Skeining 50 440 yard skeins is no small task. Maybe Santa will bring me an Electric Skeinwinder for Christmas?

    Tuesday, December 4, 2007

    I'm an ESotD!

    I was very excited to hear from Peachy last week that my site was going to be an Etsy Site of the Day on Lime & Violet's Daily Chum! I'm even more excited to read the really nice things she had to say about all my different stuff. I was actually worried that my site was too unfocused! I like the word variety a whole lot more.

    Sunday, December 2, 2007

    Free Pattern: Fleur de Lis Washcloth

    For the sake of consistency I'm moving my patterns from my old blog.

    All of my patterns (including the ones for sale) are what I call charitable copyright which means that they are intended for personal use unless you're selling the items to benefit a charity.


    This cloth design was originally written for the Cloths for Katrina drive which took place in 2005 and organized sending handmade washcloths and bars of soap to comfort evacuees of hurricane Katrina.

    Samples of this cloth are now housed in the Louisiana State Museum and tour schools to teach students about crafting for charity.

    The Fleur de Lis is an image often associated with the French Quarter and also happens to be the symbol for the NO Football team, The Saints. It took a few tries to get it the right proportions but I think this version worked out pretty well. It's a very subtle design made with simple knits and purls.

    This is a pretty easy pattern (despite how complex it might look at first) and a really quick knit (it takes me a little under two hours per cloth) if you’re in the mood to feel a quick sense of accomplishment - some days that just needs to be done.

    So here’s the pattern all written out:

    Reversible Fleur de Lis washcloth (doc) (pdf)

    Yarn: I used Lion Cotton, a worsted weight cotton from Lion Brand but any kitchen cotton type yarn like Lily’s Sugar n Cream or that WalMart brand Peaches n Cream should work fine. I’ve found it’s a lot easier to see the pattern using a solid color.

    Needles: I used Crystal Palace bamboos US size 6 but use whatever you’re comfortable with. I recommend a 6, 7, or 8.

    Gauge: Doesn’t really matter. The number of stitches for the finished object will be 30 stitches wide and 36 rows tall. The size of the finished cloth depends on the yarn, needle size, and your tension.

    CO 30 stitches (the garter border is written into the pattern)

    Knit every stitch first three rows (garter stitch border)
    4: K3 P11 K2 P 11 K3
    5: K14 P2 K14
    6: K3 P10 K4 P10 K3
    7: K9 P3 K1 P4 K1 P3 K9
    8: K3 P5 K14 P5 K3
    9: K7 P6 K1 P2 K1 P6 K7
    10: K3 P4 K3 P2 K1 P1 K2 P1 K1 P2 K3 P4 K3
    11: K7 P2 K4 P4 K4 P2 K7
    12: K3 P9 K6 P9 K3
    13: K12 P6 K12
    14: K3 P2 K2 P6 K4 P6 K2 P2 K3
    15: K5 P2 K6 P4 K6 P2 K5
    16: K3 P1 K3 P5 K6 P5 K3 P1 K3
    17: K3 P4 K4 P8 K4 P4 K3
    18: K8 P2 K10 P2 K8
    19: K3 P24 K3
    20: K30
    21: K4 P22 K4
    22: K3 P2 K6 P1 K6 P1 K6 P2 K3
    23: K6 P4 K2 P6 K2 P4 K6
    24: K3 P8 K8 P8 K3
    25: K10 P10 K10
    26: K3 P7 K10 P7 K3
    27: K10 P10 K10
    28: K3 P8 K8 P8 K3
    29: K12 P6 K12
    30: K3 P10 K4 P10 K3
    31: K13 P4 K13
    32: K3 P11 K2 P11 K3
    33: K14 P2 K14
    Knit every stitch the last three rows (garter border)

    Bind off!

    Buy some bars of soap and bundle them together for a nice gift to a friend or homeless shelter!

    If you prefer knitting from a chart here’s the charted image:


    Yes it’s a little taller than wide but trust me it looks better that way.

    The 3 stitch/row garter border is written into the chart. Knit every stitch of the first and last three rows. Then knit the first and last three stitches of each row, otherwise work in stockinette and knit or purl the dark area depending on what side you’re on. The neat part is its reversible.

    See?


    Feel free to share the pattern just please include a link to my blog in the post or printout in case I need to update with a correction! Or if you prefer you can link to the Ravelry profile for this pattern.

    Friday, November 30, 2007

    Etsy updates this weekend

    mosaic4370270

    Here are some items I'll be listing this weekend.

    The regular sized hanks of yarn are fingering weight BFL Ultra which is really soft, tight, and shiny. The skeins are 414 yards each. This is just a portion of the fiber I have dyed but I'm still processing it and getting it braided up.

    Check the flickr set for more details on each item. Let me know if you want me to place something on hold for you!

    Eat Sleep Knit

    I was approached by Erin of Eat Sleep Knit about selling my yarn on her website! So I dyed up some Aran weight skeins just for her. I'm mailing these 30 out in the morning.

    2076618116_155044dbc9

    I also have some fingering weight sock yarn and about five pounds of roving to add to my Etsy shop this weekend. Photos of those to follow!

    Wednesday, November 28, 2007

    Having a great week!

    I was checking out the Etsy treasuries and found a gold star! That means one of my items is in it :) What a nice surprise!

    Here's a screenshot:


    Yay! I'm especially flattered that mine is the only yarn in the list!

    Ooh I found one in Treasury West too!


    Sorry for the total vanity post but it was a nice way to start the new blog anyway :)