
Basic Baby Mittens in the round
You’ll need:
size US 4 double-pointed needles (dpn) (I used bry-flex plastics)
about 200 yards of worsted weight yarn (I used some unknown but fairly soft cream acrylic)
a tapestry or darning needle
note: These mittens were knit specifically for a small one year old with approx 5 1/8 inch wrist circumference and a wrist to fingertip length of about 5 inches. At the mom’s request I made these a bit small at the cuff so the baby couldn’t slip them off that easily. So I’m going to give the numbers I used then the recommended number for a slightly larger size in parentheses. The smaller size should work for a large six month old or average 8 month old. The larger size should comfortably fit a one year old.
on one dpn CO 20 (26) stitches
divide evenly over three dpns.
Join stitches and knit in a knit 1, purl 1 rib stitch for 1-1/4 inches.
Knit 6 rounds in stockinette stitch (knitting every row in the round).
Put first 4 (6) stitches on a holder.
Cast on 4 (6) new stitches. (I used a cable cast on but whatever method you’re comfortable with should work)
Continue with Stockinette stitch until the mitten measures approx 3 3/4 inches overall.
*knit 2 stitches together, knit2* repeat between asterisks to the end of the round - 14 (20) stitches remain
(larger size only repeat previous *k2tog, k2* row (14 stitches remain) )
k2tog all around - 7 stitches remain
break yarn and use a tapestry needle to run through the remaining stitches.
Bring yarn through small circle, turn mitten inside out and sew in ends.
To make thumbs: kitten mittens
Still using size 4 dpns, pick up 4 (6) stitches on the holder
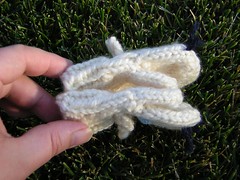
Using additional dpns pick up 2 (4) stitches on opposite side of thumbhole and 1 stitch on either side - totalling 8 (12) stitches spread evenly on 3 needles.
knit 8 (10) rounds
knit 2 together all around - 4 (6) stitches
(larger size only, knit 2 more stitches together)
Break yarn, use tapestry needle to thread through remaining stitches, sew yarn through, turn mitten and thumb inside out and sew in ends, reinforcing any loose areas or holes.
For opposite hand: put the middle 4 (6) stitches on the holder instead of the first 4 (6)
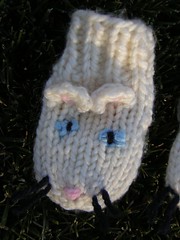
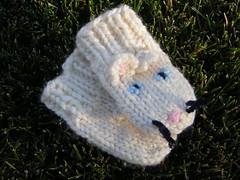
Adding the Kitty Face
You’ll need:
1 pair US 1 straight needles
the same yarn you used for the mittens, but not that much at all
a darning or tapestry needle
Scrap yarn for face - I used blue ( cotton left over from ballet t) for eyes, a dark navy blue acrylic for the pupils and whiskers, and a pink acrylic for the ear highlights and nose.
How to make ears (make four)
Using same yarn as mittens, CO 2 stitches onto US size 1 needles
Knit in the front and back of the 1st stitch, K1 - 3 stitches total
K1, KF&B, K1 - 4 stitches total
K2, KF&B, K1 - 5 stitches
K2, KF&B, K2 - 6 stitches
Bind Off all stitches, break yarn leaving a long tail to sew onto mitten.
Using tapestry needle, sew the yarn from the cast on “tip” of the ear down to the base, on the opposite side from the tail left from binding off.
Using yarn tails sew ears onto the top of the mittens, with the inside of the ears facing the fingertips - with the base of the ears approximately in line with where the thumb starts.
Optional: Using pink or white yarn (or whatever you choose) sew a few stitches that will show only on the front of the ears, to give it a little depth.
Turn mitten inside out and sew in remaining ends.
Shape ears to suit your taste.
Nose: using pink yarn (or whatever color you chose) and tapestry needle, sew a series of parallel stitches in the middle of the top tip of the mitten, I made the stitches smaller the closer they got to the tip for a triangular kitty nose effect.
Whiskers: Cut two strands of dark yarn approximately 6 inches long. Using needle, at roughly 90 degree angles from the nose or wherever you think the “cheeks” should be, tuck both ends of each yarn to the inside on each cheek, by basically sewing two very small stitches on each side. Think of these as tiny dimples. Turn mitten inside out and tie ends of each strand in a small knot, then thread the yarn ends back through the exact same holes they came in. This secures the whiskers from the inside. Trim the whiskers to your preference.
Eyes: Using blue yarn (or whatever you chose) and needle, sew a series of parallel stitches below the ears in a cats-eye shape. Or round if you want a round-eyed kitty. Then use darker yarn to sew a single vertical line for the cat’s pupil. That vertical line makes this really look like a cat. Without it, it looks a bit more bunny-like.
Make sure the ends are knotted and sewn nicely. Put mittens on their hands and watch the kitten mitten fun begin.
Let me know if anything is unclear or I’ve royally screwed up the larger size - I’ve only knit the smaller size so there’s a chance I’m way off with that one.
3 comments:
so cute! and just tiny :) thanks for sharing
Hi! I used your pattern to knit mittens for my daughter. She is 2 years old and I changed some measures... I also translated it in Italian and published in my blog, with link to your page. Hope you will like it!
How can I adapt for a 2 year old?
Post a Comment