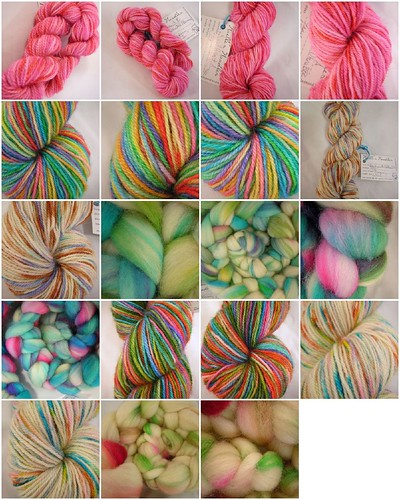
I'm halfway through my fingering weight sock yarn order for Eat Sleep Knit. I'm working overtime to get that shipped before I go on vacation.
Wednesday, December 12, 2007
Kits are selling out!
Wow! A very nice mention in the Ravelry forums has made me sell out of my Learn to Knit kits! I've started making some kits with my handspun now but I don't have a whole lot of that in stock either. Can't really complain about a problem like this can I?

I'm halfway through my fingering weight sock yarn order for Eat Sleep Knit. I'm working overtime to get that shipped before I go on vacation.
Sunday, December 9, 2007
Shibori Scarf Tutorial
Continuing to move my patterns and tutorials over to this blog :)
As usual, all of my patterns (including the ones for sale) are what I call charitable copyright which means that they are intended for personal use unless you're selling the items to benefit a charity.
This tutorial was created when I was doing the Funky Scarf Swap in Oct. 2006.
First, the swap person I got
liked the color green
preferred a funky pattern to a funky yarn
wanted it longer as opposed to fatter
could use it for some warmth.
This reminds me of my beginner 3d design class assignments, how fun!! No really!
My thought process:
I had two skeins of some lamb's pride worsted in a dark forest green but they were leftovers from two different projects so two different dye lots.
I've been wanting to try this shibori resist method for felting since I read about it in the Fall 2005 Interweave Knits. Well, technically when you knit something and change it into felt in hot water and agitation it's fulling but let's just call it felting to cut down on confusion.
So..the shibori felted examples I'd seen looked much better to me when they'd been used on stockinette stitches. So I'd want to use it in stockinette.
And since she wanted it longer I would need to knit it lengthwise - because the knit stitches felt more vertically, they don't felt as much horizontally.
So stockinette and lengthwise. I'd do it in the round! Easy peasy! Then cut it after I felt it (fyi: cutting something after knitting it is called steeking)! Woo!
So here we go..
Step 1 Knitting the scarf
I cast on 200 stitches using Lamb's Pride worsted onto size 11 denise needles using a very long cable.
Then I joined it in the round and knit a few rows of garter stitch. In this case it's a knit row, a purl row, a knit row, since it's in the round.
Didn't seem to make much of a difference the stockinette still curled. But it's ok.
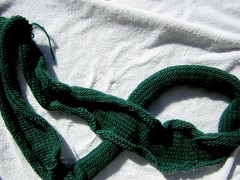
Since I was using two balls with different dye lots so I alternated the skeins every row, carrying the yarn up on the inside seam. That created the striping effect. This was totally not noticeable in the final product.
I continued knitting around and around until I ran out of the smaller ball of yarn, then I did three rows of garter stitch and cast off. I didn't bother sewing the ends in, just tied knots. That's why I love felting!
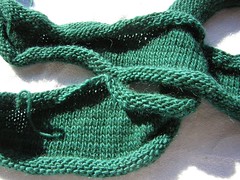
And now we have a giant knit circle that's rolling up into a tube! Yay!
Step 2: Adding the Resists

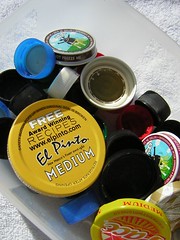
I'd been saving bottlecaps and lids for the last few months for this project. So I needed those, some rubber bands, and plastic of some kind. I found that cut up freezer storage bags worked best in the end.
I put the bottlecaps on the "wrong side" of the knitting (the purl side), then covered the top, the "right side" with the plastic.
THEN I used old rubber bands to secure the knitting between the plastic wrap and the bottlecap.
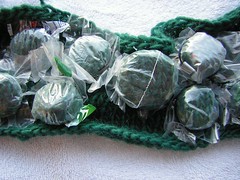
This is what the "wrong side" looked like
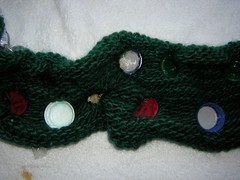
I carefully planned out the shapes on both sides of the scarf while I was attaching the bottlecaps. I already knew where the neck was going to be and where I was going to "steek" it. So the bottom edges will have more bumps in them and slowly taper off up towards the neck.
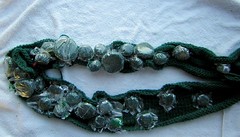

Step 3: Felting
I put the scarf in a lingerie washing bag, you know the kind with the holes in it? (I use that to cut down on the chances of fluffy bits clogging up my washing machine)
And dropped it in the washing machine with my pair of "felting" jeans. These are some big old jeans of Cody's that have shrunk anyway so they make for great felting agitation in the machine.
I filled the machine to the small water setting on hot with some squirts of lavender baby shampoo. And ran it about one and a half washing cycles, about fifteen minutes, checking periodically to see how it was doing.
When it seemed felted enough, I ran it in a cold rinse and spin. People debate the spin cycle thinking that it causes creases in the felted product but I like to use it and I don't let it spin for that long.
Then I took it out and rinsed it again just to be sure the soap was out.
Step 4: Removing resists, trimming, and drying
Be warned, when it came out it was a MESS. The plastic hadn't stayed on all the bottlecaps and even a few bottlecaps had come off. THAT WAS OK! It still looked pretty neat and I liked the randomness of what had stayed and what hadn't.
I took the remaining rubber bands, plastic, bottlecaps, and lids out while the scarf was still wet and pliable. I also used this as an opportunity to reshape any spots that weren't right, felt any missed bits by hand, trim extra fuzzy bits I didn't like, and cut off the ends that I hadn't sewn in before.
I also cut the steek with a pair of scissors and fuzzed the end up a bit. Now it's an actual scarf not a big circle!
Then I hung it on a hanger and let it dry for a few days.
Step 5: Having a Funky Scarf!!
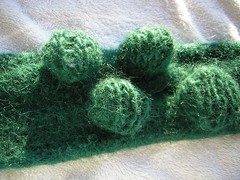
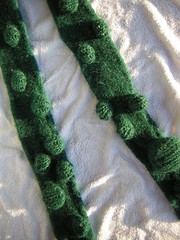

The "cut" end
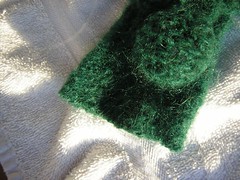
ignore the painty spotty work short
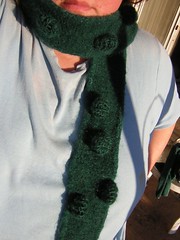
I created a flickr set with more photos and complete instructions as well.
You can use more than bottlecaps but anything that can be tied to the scarf and survive a good hot washing machine.
This same resist method can be used for dyeing as well as felting! Didn't you wonder where the hippies came up with the idea for "tie dyes"? It's based on the shibori resist concept! You can just tie the fabric up in various ways and see what comes out! There are particularly beautiful results with silk.
As usual, all of my patterns (including the ones for sale) are what I call charitable copyright which means that they are intended for personal use unless you're selling the items to benefit a charity.
This tutorial was created when I was doing the Funky Scarf Swap in Oct. 2006.
First, the swap person I got
This reminds me of my beginner 3d design class assignments, how fun!! No really!
My thought process:
I had two skeins of some lamb's pride worsted in a dark forest green but they were leftovers from two different projects so two different dye lots.
I've been wanting to try this shibori resist method for felting since I read about it in the Fall 2005 Interweave Knits. Well, technically when you knit something and change it into felt in hot water and agitation it's fulling but let's just call it felting to cut down on confusion.
So..the shibori felted examples I'd seen looked much better to me when they'd been used on stockinette stitches. So I'd want to use it in stockinette.
And since she wanted it longer I would need to knit it lengthwise - because the knit stitches felt more vertically, they don't felt as much horizontally.
So stockinette and lengthwise. I'd do it in the round! Easy peasy! Then cut it after I felt it (fyi: cutting something after knitting it is called steeking)! Woo!
So here we go..
Step 1 Knitting the scarf
I cast on 200 stitches using Lamb's Pride worsted onto size 11 denise needles using a very long cable.
Then I joined it in the round and knit a few rows of garter stitch. In this case it's a knit row, a purl row, a knit row, since it's in the round.
Didn't seem to make much of a difference the stockinette still curled. But it's ok.

Since I was using two balls with different dye lots so I alternated the skeins every row, carrying the yarn up on the inside seam. That created the striping effect. This was totally not noticeable in the final product.
I continued knitting around and around until I ran out of the smaller ball of yarn, then I did three rows of garter stitch and cast off. I didn't bother sewing the ends in, just tied knots. That's why I love felting!
And now we have a giant knit circle that's rolling up into a tube! Yay!

Step 2: Adding the Resists

I'd been saving bottlecaps and lids for the last few months for this project. So I needed those, some rubber bands, and plastic of some kind. I found that cut up freezer storage bags worked best in the end.
I put the bottlecaps on the "wrong side" of the knitting (the purl side), then covered the top, the "right side" with the plastic.
THEN I used old rubber bands to secure the knitting between the plastic wrap and the bottlecap.

This is what the "wrong side" looked like

I carefully planned out the shapes on both sides of the scarf while I was attaching the bottlecaps. I already knew where the neck was going to be and where I was going to "steek" it. So the bottom edges will have more bumps in them and slowly taper off up towards the neck.


Step 3: Felting
I put the scarf in a lingerie washing bag, you know the kind with the holes in it? (I use that to cut down on the chances of fluffy bits clogging up my washing machine)
And dropped it in the washing machine with my pair of "felting" jeans. These are some big old jeans of Cody's that have shrunk anyway so they make for great felting agitation in the machine.
I filled the machine to the small water setting on hot with some squirts of lavender baby shampoo. And ran it about one and a half washing cycles, about fifteen minutes, checking periodically to see how it was doing.
When it seemed felted enough, I ran it in a cold rinse and spin. People debate the spin cycle thinking that it causes creases in the felted product but I like to use it and I don't let it spin for that long.
Then I took it out and rinsed it again just to be sure the soap was out.
Step 4: Removing resists, trimming, and drying
Be warned, when it came out it was a MESS. The plastic hadn't stayed on all the bottlecaps and even a few bottlecaps had come off. THAT WAS OK! It still looked pretty neat and I liked the randomness of what had stayed and what hadn't.
I took the remaining rubber bands, plastic, bottlecaps, and lids out while the scarf was still wet and pliable. I also used this as an opportunity to reshape any spots that weren't right, felt any missed bits by hand, trim extra fuzzy bits I didn't like, and cut off the ends that I hadn't sewn in before.
I also cut the steek with a pair of scissors and fuzzed the end up a bit. Now it's an actual scarf not a big circle!
Then I hung it on a hanger and let it dry for a few days.
Step 5: Having a Funky Scarf!!


The "cut" end

ignore the painty spotty work short

I created a flickr set with more photos and complete instructions as well.
You can use more than bottlecaps but anything that can be tied to the scarf and survive a good hot washing machine.
This same resist method can be used for dyeing as well as felting! Didn't you wonder where the hippies came up with the idea for "tie dyes"? It's based on the shibori resist concept! You can just tie the fabric up in various ways and see what comes out! There are particularly beautiful results with silk.
Wednesday, December 5, 2007
Eat Sleep Knit aran weight yarns are in stock!
My yarn arrived in Atlanta yesterday and wow Erin already has them all photographed and listed!

She also wrote a very nice blog post about it.

I'm just giddy with excitement (I really am!) about all the big moves my Noodles have been making lately!
I'm already slaving away on the fingering weight yarn for the December shipment. Skeining 50 440 yard skeins is no small task. Maybe Santa will bring me an Electric Skeinwinder for Christmas?

She also wrote a very nice blog post about it.

I'm just giddy with excitement (I really am!) about all the big moves my Noodles have been making lately!
I'm already slaving away on the fingering weight yarn for the December shipment. Skeining 50 440 yard skeins is no small task. Maybe Santa will bring me an Electric Skeinwinder for Christmas?
Tuesday, December 4, 2007
I'm an ESotD!
I was very excited to hear from Peachy last week that my site was going to be an Etsy Site of the Day on Lime & Violet's Daily Chum! I'm even more excited to read the really nice things she had to say about all my different stuff. I was actually worried that my site was too unfocused! I like the word variety a whole lot more.
Sunday, December 2, 2007
Free Pattern: Fleur de Lis Washcloth
For the sake of consistency I'm moving my patterns from my old blog.
All of my patterns (including the ones for sale) are what I call charitable copyright which means that they are intended for personal use unless you're selling the items to benefit a charity.

This cloth design was originally written for the Cloths for Katrina drive which took place in 2005 and organized sending handmade washcloths and bars of soap to comfort evacuees of hurricane Katrina.
Samples of this cloth are now housed in the Louisiana State Museum and tour schools to teach students about crafting for charity.
The Fleur de Lis is an image often associated with the French Quarter and also happens to be the symbol for the NO Football team, The Saints. It took a few tries to get it the right proportions but I think this version worked out pretty well. It's a very subtle design made with simple knits and purls.
This is a pretty easy pattern (despite how complex it might look at first) and a really quick knit (it takes me a little under two hours per cloth) if you’re in the mood to feel a quick sense of accomplishment - some days that just needs to be done.
So here’s the pattern all written out:
Reversible Fleur de Lis washcloth (doc) (pdf)
Yarn: I used Lion Cotton, a worsted weight cotton from Lion Brand but any kitchen cotton type yarn like Lily’s Sugar n Cream or that WalMart brand Peaches n Cream should work fine. I’ve found it’s a lot easier to see the pattern using a solid color.
Needles: I used Crystal Palace bamboos US size 6 but use whatever you’re comfortable with. I recommend a 6, 7, or 8.
Gauge: Doesn’t really matter. The number of stitches for the finished object will be 30 stitches wide and 36 rows tall. The size of the finished cloth depends on the yarn, needle size, and your tension.
CO 30 stitches (the garter border is written into the pattern)
Knit every stitch first three rows (garter stitch border)
4: K3 P11 K2 P 11 K3
5: K14 P2 K14
6: K3 P10 K4 P10 K3
7: K9 P3 K1 P4 K1 P3 K9
8: K3 P5 K14 P5 K3
9: K7 P6 K1 P2 K1 P6 K7
10: K3 P4 K3 P2 K1 P1 K2 P1 K1 P2 K3 P4 K3
11: K7 P2 K4 P4 K4 P2 K7
12: K3 P9 K6 P9 K3
13: K12 P6 K12
14: K3 P2 K2 P6 K4 P6 K2 P2 K3
15: K5 P2 K6 P4 K6 P2 K5
16: K3 P1 K3 P5 K6 P5 K3 P1 K3
17: K3 P4 K4 P8 K4 P4 K3
18: K8 P2 K10 P2 K8
19: K3 P24 K3
20: K30
21: K4 P22 K4
22: K3 P2 K6 P1 K6 P1 K6 P2 K3
23: K6 P4 K2 P6 K2 P4 K6
24: K3 P8 K8 P8 K3
25: K10 P10 K10
26: K3 P7 K10 P7 K3
27: K10 P10 K10
28: K3 P8 K8 P8 K3
29: K12 P6 K12
30: K3 P10 K4 P10 K3
31: K13 P4 K13
32: K3 P11 K2 P11 K3
33: K14 P2 K14
Knit every stitch the last three rows (garter border)
Bind off!
Buy some bars of soap and bundle them together for a nice gift to a friend or homeless shelter!
If you prefer knitting from a chart here’s the charted image:
Yes it’s a little taller than wide but trust me it looks better that way.
The 3 stitch/row garter border is written into the chart. Knit every stitch of the first and last three rows. Then knit the first and last three stitches of each row, otherwise work in stockinette and knit or purl the dark area depending on what side you’re on. The neat part is its reversible.
See?

All of my patterns (including the ones for sale) are what I call charitable copyright which means that they are intended for personal use unless you're selling the items to benefit a charity.

This cloth design was originally written for the Cloths for Katrina drive which took place in 2005 and organized sending handmade washcloths and bars of soap to comfort evacuees of hurricane Katrina.
Samples of this cloth are now housed in the Louisiana State Museum and tour schools to teach students about crafting for charity.
The Fleur de Lis is an image often associated with the French Quarter and also happens to be the symbol for the NO Football team, The Saints. It took a few tries to get it the right proportions but I think this version worked out pretty well. It's a very subtle design made with simple knits and purls.
This is a pretty easy pattern (despite how complex it might look at first) and a really quick knit (it takes me a little under two hours per cloth) if you’re in the mood to feel a quick sense of accomplishment - some days that just needs to be done.
So here’s the pattern all written out:
Reversible Fleur de Lis washcloth (doc) (pdf)
Yarn: I used Lion Cotton, a worsted weight cotton from Lion Brand but any kitchen cotton type yarn like Lily’s Sugar n Cream or that WalMart brand Peaches n Cream should work fine. I’ve found it’s a lot easier to see the pattern using a solid color.
Needles: I used Crystal Palace bamboos US size 6 but use whatever you’re comfortable with. I recommend a 6, 7, or 8.
Gauge: Doesn’t really matter. The number of stitches for the finished object will be 30 stitches wide and 36 rows tall. The size of the finished cloth depends on the yarn, needle size, and your tension.
CO 30 stitches (the garter border is written into the pattern)
Knit every stitch first three rows (garter stitch border)
4: K3 P11 K2 P 11 K3
5: K14 P2 K14
6: K3 P10 K4 P10 K3
7: K9 P3 K1 P4 K1 P3 K9
8: K3 P5 K14 P5 K3
9: K7 P6 K1 P2 K1 P6 K7
10: K3 P4 K3 P2 K1 P1 K2 P1 K1 P2 K3 P4 K3
11: K7 P2 K4 P4 K4 P2 K7
12: K3 P9 K6 P9 K3
13: K12 P6 K12
14: K3 P2 K2 P6 K4 P6 K2 P2 K3
15: K5 P2 K6 P4 K6 P2 K5
16: K3 P1 K3 P5 K6 P5 K3 P1 K3
17: K3 P4 K4 P8 K4 P4 K3
18: K8 P2 K10 P2 K8
19: K3 P24 K3
20: K30
21: K4 P22 K4
22: K3 P2 K6 P1 K6 P1 K6 P2 K3
23: K6 P4 K2 P6 K2 P4 K6
24: K3 P8 K8 P8 K3
25: K10 P10 K10
26: K3 P7 K10 P7 K3
27: K10 P10 K10
28: K3 P8 K8 P8 K3
29: K12 P6 K12
30: K3 P10 K4 P10 K3
31: K13 P4 K13
32: K3 P11 K2 P11 K3
33: K14 P2 K14
Knit every stitch the last three rows (garter border)
Bind off!
Buy some bars of soap and bundle them together for a nice gift to a friend or homeless shelter!
If you prefer knitting from a chart here’s the charted image:
Yes it’s a little taller than wide but trust me it looks better that way.
The 3 stitch/row garter border is written into the chart. Knit every stitch of the first and last three rows. Then knit the first and last three stitches of each row, otherwise work in stockinette and knit or purl the dark area depending on what side you’re on. The neat part is its reversible.
See?

Feel free to share the pattern just please include a link to my blog in the post or printout in case I need to update with a correction! Or if you prefer you can link to the Ravelry profile for this pattern.
Friday, November 30, 2007
Etsy updates this weekend

Here are some items I'll be listing this weekend.
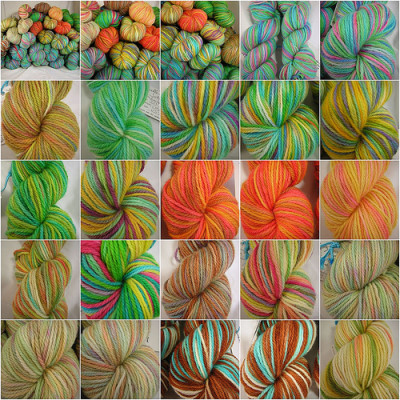
The regular sized hanks of yarn are fingering weight BFL Ultra which is really soft, tight, and shiny. The skeins are 414 yards each. This is just a portion of the fiber I have dyed but I'm still processing it and getting it braided up.
Check the flickr set for more details on each item. Let me know if you want me to place something on hold for you!
Eat Sleep Knit
I was approached by Erin of Eat Sleep Knit about selling my yarn on her website! So I dyed up some Aran weight skeins just for her. I'm mailing these 30 out in the morning.

I also have some fingering weight sock yarn and about five pounds of roving to add to my Etsy shop this weekend. Photos of those to follow!

I also have some fingering weight sock yarn and about five pounds of roving to add to my Etsy shop this weekend. Photos of those to follow!
Subscribe to:
Posts (Atom)